一. Koa 的基本使用
引言
前面我们已经学习了 express,另外一个非常流行的 Node Web 服务器框架就是 Koa。
认识
官方介绍:
英:next generation web framework for node.js
中:node.js 的下一代 web 框架
事实上,Koa 是 express 同一个团队开发的一个新的 Web 框架:
目前团队的核心开发者
TJ的主要精力也在维护 Koa,express 已经交给团队维护了。
Koa 旨在为 Web 应用程序和 API 提供更小、更丰富和更强大的能力。
Koa 相对于 express 具有更强的异步处理能力。
Koa 的核心代码只有 1600+ 行,是一个更加轻量级的框架。
我们可以根据需要安装和使用中间件。
事实上学习了 express 之后,学习 Koa 的过程是很简单的。
安装 Koa:
npm i koa初体验
我们来体验一下 Koa 的 Web 服务器,创建一个接口:
Koa 也是通过注册中间件来完成请求操作的。
Koa 注册的中间件提供了两个参数:
ctx:上下文对象Koa 并没有像 express 一样,将
req和res分开,而是将它们作为ctx的属性。ctx代表一次请求的上下文对象。ctx.request:获取请求对象。ctx.response:获取响应对象。next:本质上是一个dispatch,类似于之前的next后续我们学习 Koa 的源码,来看一下它是一个怎么样的函数。
示例:
const Koa = require('koa')
const app = new Koa()

// 注册中间件(middleware)
// Koa中间件有两个参数:ctx/next
app.use((ctx, next) => {
  // 1.请求对象
  // ctx.request:Koa封装的请求对象
  console.log('ctx.request: ', ctx.request)
  // ctx.req: node封装的请求对象(http.createServer中的请求对象)
  console.log('ctx.req: ', ctx.req)

  // 2.响应对象
  // ctx.response: Koa封装的响应对象
  console.log('ctx.response: ', ctx.response)
  // ctx.res: node封装的响应对象(http.createServer中的响应对象)
  console.log('ctx.res: ', ctx.res)

  // 3.其他属性
  console.log('ctx.query: ', ctx.query)
  next()
})

app.use(() => {
  console.log('hello world~')
})

app.listen(6000, () => {
  console.log('Koa server running~')
})
🔔 提示
Koa在没有提供对应的服务时,Koa没有像express那样提供一个对应的页面,而是返回Not Found。
中间件
Koa 通过创建的 app 对象,注册中间件只能通过 use 方法:
Koa本身没有提供methods的方式来注册中间件- 也没有提供
path中间件来匹配路径
但是真实开发中我们如何将路径和 method 分离呢?
方式一:根据
request自己来判断jsconst Koa = require('koa') const app = new Koa() app.use((ctx, next) => { const { path, request, method } = ctx console.log(path === request.path) // true const mtd = method == 'GET' ? 'GET' : 'POST' switch (path) { case '/users': ctx.body = `${mtd} users` break case '/home': ctx.body = `${mtd} home` break case '/login': ctx.body = `${mtd} login` break } }) app.listen(6000, () => { console.log('Koa server running~') })方式二:使用第三方路由中间件(看下一节)
路由
Koa 官方并没有给我们提供路由的库,我们可以选择第三方库 @koa/router:
npm i @koa/router我们可以先封装一个 userRouter.js 的文件:
const KoaRouter = require('@koa/router')

// 1.创建路由对象
const userRouter = new KoaRouter({
  prefix: '/users',
})

// 2.在路由中注册中间件:path/method
userRouter.get('/', (ctx, next) => {
  ctx.body = 'users 01'
})
userRouter.get('/:id', (ctx, next) => {
  const { id } = ctx.params
  ctx.body = '获取某一个用户' + id
})
userRouter.post('/', (ctx, next) => {
  ctx.body = '创建用户成功'
})
userRouter.delete('/:id', (ctx, next) => {
  const { id } = ctx.params
  ctx.body = '删除某一个用户' + id
})
userRouter.patch('/:id', (ctx, next) => {
  const { id } = ctx.params
  ctx.body = '修改某一个用户' + id
})

module.exports = userRouter
在 app 中将 router.routes() 注册为中间件:
const Koa = require('koa')
const userRouter = require('./router/userRouter')

const app = new Koa()

// 3.让路由中的中间件生效
app.use(userRouter.routes())
app.use(userRouter.allowedMethods())

app.listen(6000, () => {
  console.log('Koa server running~')
})
⚠️ 注意
allowedMethods() 方法用于判断某一个 method 是否支持。
- 如果我们请求
get,那么是正常的请求,因为我们有实现get。 - 如果我们请求
put、delete、patch,会自动报错:Method Not Allowed,状态码:405。 - 如果我们请求
link、copy、lock,会自动报错:Not Implemented,状态码:501。
二. Koa 的参数解析
本章节参数解析示例都是基于此配置
const Koa = require('koa')
const KoaRouter = require('@koa/router')

const app = new Koa()
const userRouter = new KoaRouter({
  prefix: '/users',
})

/**
 * 1. get:  params方式,例子:/id
 * 2. get:  query方式,例子:?name=later-zc&age=1
 * 3. post: json方式,例子:{"name": "later-zc"}
 * 4. post: x-www-form-urlencode
 * 5. post: form-data
 */

app.use(userRouter.routes())
app.use(userRouter.allowedMethods())

app.listen(6000, () => {
  console.log('Koa server running~')
})
参数解析:path / query
- 路径参数
// params
userRouter.get('/:userID', (ctx, next) => {
  const { userID } = ctx.params
  ctx.body = 'params ' + userID // params 123
})- 查询参数
// query
userRouter.get('/', (ctx, next) => {
  const { name, age } = ctx.query
  ctx.body = name + ' ' + age // later-zc 18
})
参数解析:body - json
请求地址:http://localhost:6000/users
body是json格式:{"name": "later-zc", "password": "123"}
获取 JSON 数据:
安装
koa-bodyparser依赖:bashnpm i koa-bodyparser使用
koa-bodyparser的中间件:jsconst bodyParser = require('koa-bodyparser') // ... app.use(bodyParser()) // post/json userRouter.post('/', (ctx, next) => { const { name, age } = ctx.request.body ctx.body = name + ' ' + age })⚠️ 注意
不能从
ctx.body中获取,ctx.body用来返回数据。
参数解析:body - x-www-form-urlencoded
请求地址:http://localhost:6000/users/urlencode
body是x-www-form-urlencoded格式:
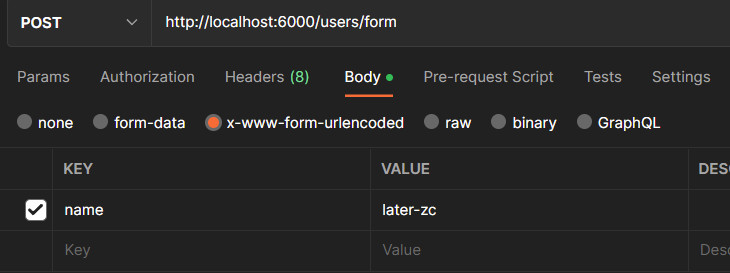
获取 JSON 数据:(和解析 json body 是一致的):
安装
koa-bodyparser依赖:bashnpm i koa-bodyparser使用
koa-bodyparser的中间件:jsconst bodyParser = require('koa-bodyparser') // ... app.use(bodyParser()) // post/urlencode userRouter.post('/urlencode', (ctx, next) => { const { name } = ctx.request.body ctx.body = name })
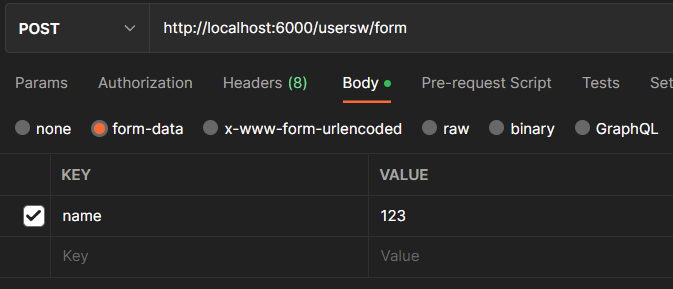
参数解析:body - form-data
请求地址:http://localhost:8000/login
body是form-data格式:
解析 body 中的数据,我们需要使用 multer:
安装
@koa/multer、multer依赖:bashnpm i @koa/multer multer使用
multer中间件:jsconst multer = require('@koa/multer') // ... const formParser = multer() // form-data userRouter.post('/form', formParser.any(), (ctx, next) => { const { name } = ctx.request.body ctx.body = name })
Multer 上传文件
const Koa = require('koa')
const KoaRouter = require('@koa/router')
const multer = require('@koa/multer')

const app = new Koa()
const upload = multer({
  // dest: './uploads',
  storage: multer.diskStorage({
    destination(req, file, cb) {
      cb(null, './uploads')
    },
    filename(req, file, cb) {
      cb(null, Date.now() + '_' + file.originalname)
    },
  }),
})
const uploadRouter = new KoaRouter({
  prefix: '/upload',
})

// 单文件
uploadRouter.post('/avatar', upload.single('avatar'), (ctx, next) => {
  console.log('ctx.request.file: ', ctx.request.file)
  ctx.body = '文件上传成功'
})
// 多文件
uploadRouter.post('/photos', upload.array('photos'), (ctx, next) => {
  console.log('ctx.request.files: ', ctx.request.files)
  ctx.body = '文件上传成功'
})

app.use(uploadRouter.routes())
app.use(uploadRouter.allowedMethods())

app.listen(6000, () => {
  console.log('Koa server running~')
})
三. Koa 响应和错误
响应数据
输出结果:body 将响应主体设置为以下之一:
string:字符串数据Buffer:Buffer 数据Stream:流数据Object||Array:对象或数组null:不输出任何内容- 如果
response.status尚未设置,Koa 会自动将状态设置为200或204
请求状态:status:
const fs = require('fs')
const Koa = require('koa')
const koaRouter = require('@koa/router')
const bodyParser = require('koa-bodyparser')

const app = new Koa()

app.use(bodyParser())

const userRouter = new KoaRouter({
  prefix: '/users',
})

userRouter.get('/', (ctx, next) => {
  // 1.body类型是string
  // ctx.body = 'hello world'

  // 2.body类型是Buffer
  // ctx.body = Buffer.from('hello world')

  // 3.body的类型是Stream
  // const readStream = fs.createReadStream('./uploads/01.png')
  // ctx.type = 'image/png'
  // ctx.body = readStream

  // 4.body的类型是数据(array/object)
  // ctx.body = {
  //   code: 0,
  //   data: [
  //     { id: 111, price: 99 },
  //     { id: 112, price: 89 },
  //   ],
  // }

  // 5.body的类型是null, 自动设置http状态码为204 no content
  ctx.body = null
})

app.use(userRouter.routes())
app.use(userRouter.allowedMethods())

app.listen(8000, () => {
  console.log('Koa server running~')
})
错误处理
const Koa = require('koa')
const KoaRouter = require('@koa/router')

const app = new Koa()

const userRouter = new KoaRouter({
  prefix: '/users',
})

userRouter.get('/', (ctx, next) => {
  const isAuth = false
  if (isAuth) {
    ctx.body = {
      username: 'later-zc',
      age: 18,
    }
  } else {
    // EventEmitter
    ctx.app.emit('error', -1003, ctx)
  }
})

app.use(userRouter.routes())
app.use(userRouter.allowedMethods())

// 独立的文件:error-handle.js
app.on('error', (code, ctx) => {
  let message = '未知错误'
  switch (code) {
    case -1001:
      message = '账户或密码错误'
      break
    case -1002:
      message = '请求参数不正确'
      break
    case -1003:
      message = 'token未授权'
      break
  }
  ctx.body = {
    code,
    message,
  }
})

app.listen(8000, () => {
  console.log('Koa server running~')
})
四. Koa 静态服务器
koa 并没有内置部署相关的功能,所以我们需要使用第三方库:
bashnpm i Koa-static部署的过程类似于 express:
jsconst Koa = require('koa') const static = require('koa-static') const app = new Koa() app.use(static('./uploads')) // 静态资源所在目录,访问时:http://127.0.0.1:8000/01.png app.use(static('./build')) app.listen(8000, () => { console.log('Koa server running~') })
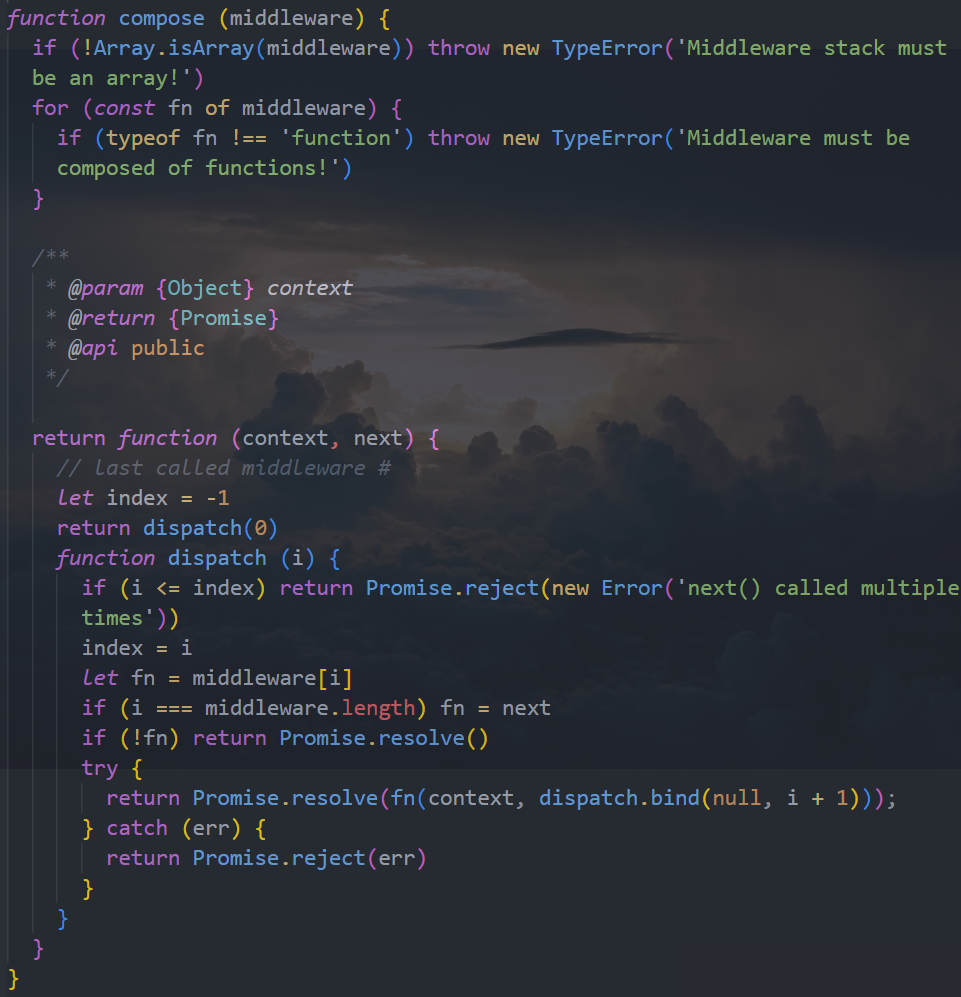
五. Koa 的源码解析
创建 Koa 的过程
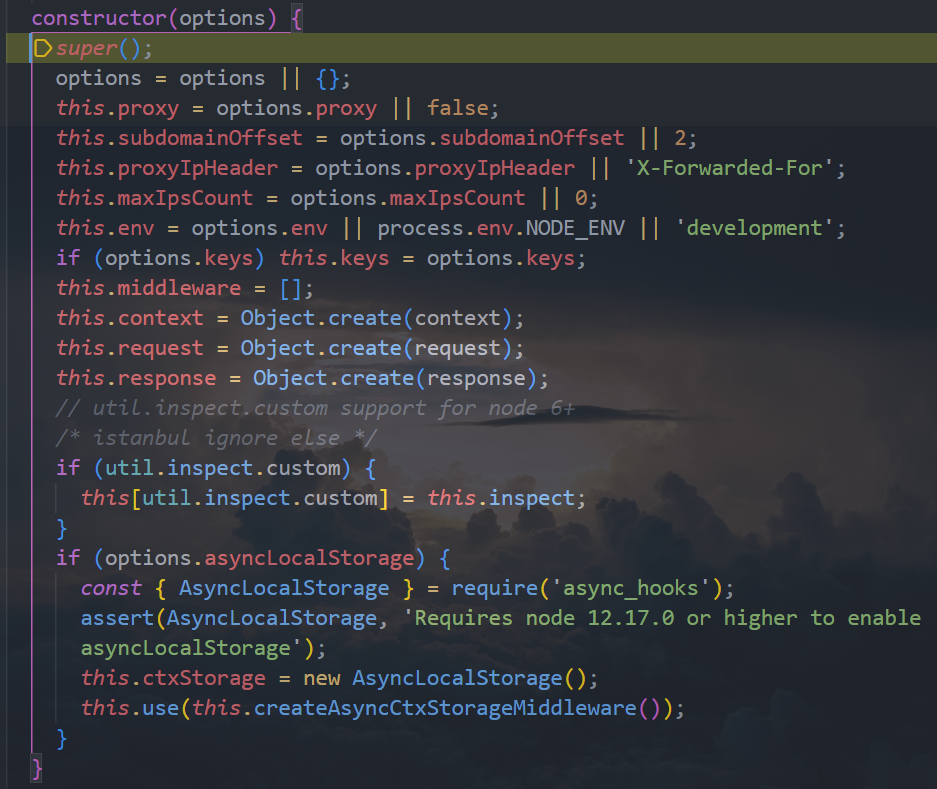
开启监听
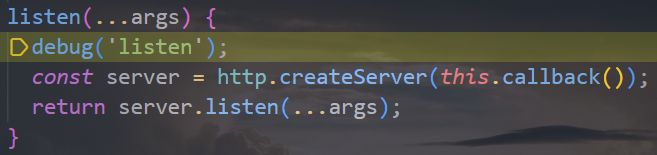
注册中间件
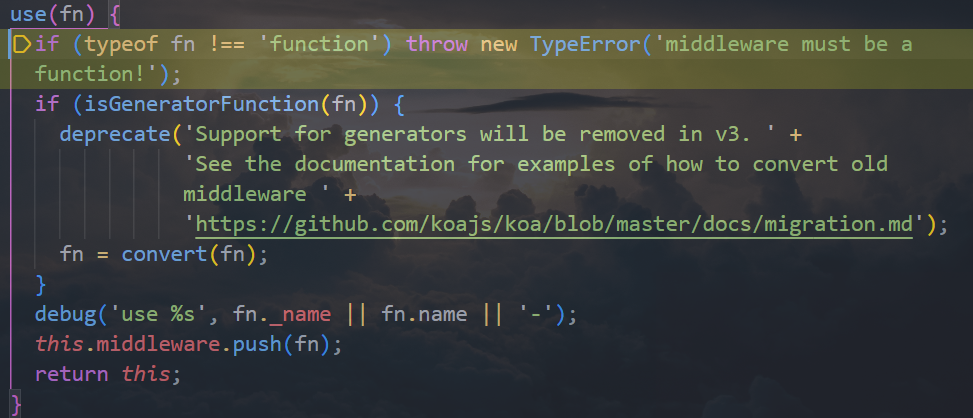
监听回调
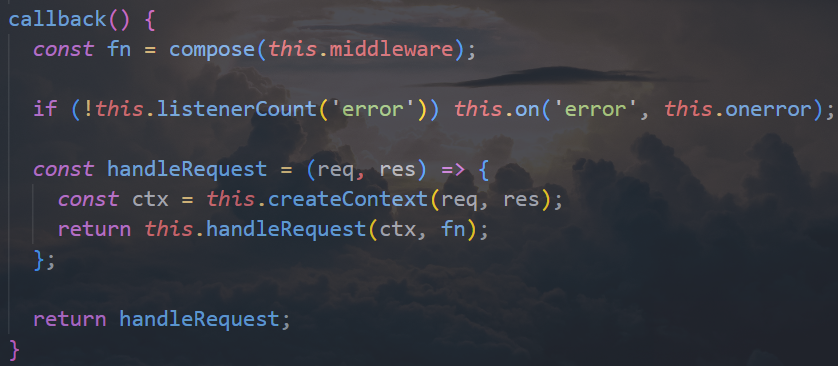
compose 方法
六. 和 express 对比
架构设计对比
在学习了两个框架之后,我们应该已经可以发现 Koa 和 express 的区别:
从架构设计上来说:
express 是完整和强大的,其中帮助我们内置了非常多好用的功能。
Koa 是简洁和自由的,它只包含最核心的功能,并不会对我们使用其他中间件进行任何的限制,甚至是在
app中连最基本的get、post都没有提供。 我们需要通过自己或者路由来判断请求方式或者其他功能。
因为 express 和 Koa 框架他们的核心其实都是中间件:
但是他们的中间件事实上,它们的中间件的执行机制是不同的,特别是针对某个中间件中包含异步操作时。 所以,接下来我们再来研究一下
express和Koa中间件的执行顺序问题。
案例对比
通过一个需求来演示所有的过程:
- 假如有三个中间件会在一次请求中匹配到,并且按照顺序执行
- 我希望最终实现的方案是:
- 在
middleware1中,在req.message中添加一个字符串aaa - 在
middleware2中,在req.message中添加一个 字符串bbb - 在
middleware3中,在req.message中添加一个 字符串ccc - 当所有内容添加结束后,在
middleware1中,通过res返回最终的结果
- 在
实现方案:
express 同步数据的实现
jsconst express = require('express') const app = express() app.use((req, res, next) => { req.msg = 'aaa' console.log('express middleware 01') next() console.log('first') res.end(req.msg) }) app.use((req, res, next) => { req.msg += 'bbb' console.log('express middleware 02') next() }) app.use((req, res, next) => { req.msg += 'ccc' console.log('express middleware 03') }) // output: // express middleware 01 // express middleware 02 // express middleware 03 // first // 服务器响应结果:aaabbbccc app.listen(8000, () => { console.log('express server running~') })Koa同步数据的实现jsconst Koa = require('koa') const app = new Koa() app.use((ctx, next) => { console.log('Koa middleware 01') ctx.msg = 'aaa' next() console.log('first') ctx.body = ctx.msg }) app.use((ctx, next) => { ctx.msg += 'bbb' console.log('Koa middleware 02') next() }) app.use((ctx, next) => { ctx.msg += 'ccc' console.log('Koa middleware 03') }) // output: // Koa middleware 01 // Koa middleware 02 // Koa middleware 03 // first // 服务器响应结果:aaabbbccc app.listen(8000, () => { console.log('Koa server running~') })Express异步数据的实现jsconst express = require('express') const axios = require('axios') const app = express() app.use(async (req, res, next) => { console.log('express middleware 01') req.msg = 'aaa' await next() console.log('first') res.end(req.msg) }) app.use(async (req, res, next) => { console.log('express middleware 02') req.msg += 'bbb' await next() }) app.use(async (req, res, next) => { console.log('express middleware 03') const result = await '---' // 这里比较特殊,如果是await表达式是一个普通值,next会继续等待后续代码执行完成 req.msg += result console.log('111') // 如果遇到await表达式是网络请求返回promise的形式,next不会等待后面的代码执行完成,即使是await next() const result2 = await axios.get('http://123.207.32.32:8000/home/multidata') req.msg += result2.data.data.banner.list[0].title console.log('222') }) // output: // express server running~ // express middleware 01 // express middleware 02 // express middleware 03 // 111 // first // 222 // 服务器返回结果:aaabbb--- app.listen(8000, () => { console.log('express server running~') })Koa异步数据的实现jsconst Koa = require('koa') const axios = require('axios') const app = new Koa() app.use(async (ctx, next) => { console.log('Koa middleware 01') ctx.msg = 'aaa' await next() console.log('first') ctx.body = ctx.msg }) app.use(async (ctx, next) => { console.log('Koa middleware 02') ctx.msg += 'bbb' // 如果执行的下一个中间件是一个异步函数,那么next默认不会等到中间件的结果,就会执行下一步操作 // 如果希望等待下一个异步函数的执行结果,则需要在next函数前面加await await next() console.log('立即执行') }) app.use(async (ctx, next) => { console.log('Koa middleware 03') const res = await '---' // 模拟网络请求 ctx.msg += res }) // output: // Koa middleware 01 // Koa middleware 02 // Koa middleware 03 // 立即执行 // first // 服务器响应结果:aaabbb--- app.listen(8000, () => { console.log('Koa server running~') })
总结
- 默认
next会等待下一个中间件函数执行完成,才会继续执行当前中间件中的代码,如果next执行的下一个中间件中有异步操作,那么next默认是不会等待该中间件的异步处理完成,就会执行当前中间件函数中的后续代码。 - 没有
await的next,会根据同步代码中的响应数据返回给客户端,如果同步中没有响应数据给客户端,则挂起(即404),如果有的话,则根据同步响应数据中的先后顺序,后面的响应覆盖前面的。 - 如果希望等待下一个其中带有异步操作的中间件函数的执行结果,
Koa则需要在next函数前面加await,而express即使加上await也不行。
⚠️ 注意
经测试,在
express中,如果希望等待下一个异步中间件函数的执行结果,上面我们说过即使加上await也不行,但是有一种特殊情况,就是如下情况:jsconst result = await '---' // 这里比较特殊,如果await表达式是一个普通值,不影响后续代码 req.msg += result console.log('111') // 如果await表达式是网络请求返回promise的形式,这后面的代码会影响,next不会等待 const result2 = await axios.get('http://123.207.32.32:8000/home/multidata') req.msg += result2.data.data.banner.list[0].title console.log('222')猜测:应该是如果
await后面表达式是一个非异步处理,await其内部源码实现应该做了边界处理,从而对这类非异步的表达式当成同步操作立马返回结果。
Koa 洋葱模型
洋葱模型 官方并无此概念,而是社区中有人提出的,两层理解含义:
- 中间件处理代码的过程
Response返回body执行