一. 项目介绍 - 网易云音乐


二. 项目搭建
早期创建的
react项目,默认使用的是yarn包管理工具(因为早期npm不如yarn)创建
TS + react项目方式:方式一(基本不采用):
create-react-app的方式创建一个项目,然后手动从零配置TS弊端一:
react是基于webpack创建的项目,所有的配置默认是隐藏的,即使通过eject暴露配置,但是修改配置是很麻烦的(比从零配置还麻烦),也很容易配置失败
弊端二:
TS的配置涉及到的东西比较多麻烦(有难度)TS代码最终是要编译成js代码的TypeScript Complier(tsc):类型检测babel:最终转换为js
方式二:
create-react-app脚手架- 同时配置
TypeScript的支持
shellcreate-react-app react-ts-music --template typescript项目配置:
配置项目的
icon配置项目的标题
配置项目别名等(
craco.config.ts)js// craco.config.js const path = require('path') const resolve = (dir) => path.resolve(__dirname, dir) module.exports = { webpack: { alias: { '@': resolve('src'), }, }, }配置
tsconfig.jsonbaseUrl:指定解析非相对模块名所基于的目录paths:指定TS如何解析你的require/imports中的导入
json// tsconfig.json { "compilerOptions": { // ... + "baseUrl": ".", + "paths": { + "@/*": ["./src/*"] + } }, }
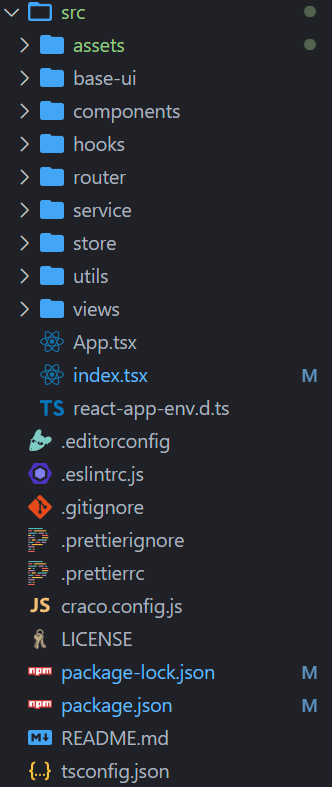
三. 项目目录结构划分
对项目进行目录结构的划分
四. CSS样式的重置
对默认
CSS样式进行重置:normalize.cssreset.less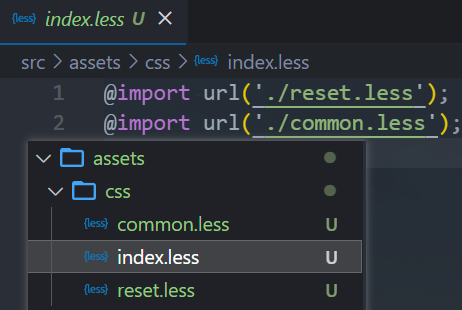
即使在入口文件进行引入,默认
less文件是会被忽略的(不起作用)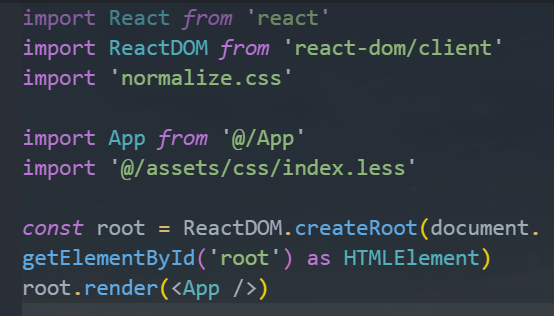
安装
craco-lesscraco-less@2.0.0对等依赖的是@craco/craco@^6.0.0- 而我们这里使用的是
@craco/craco@7.0.0,所以安装alpha版本
shellnpm i craco-less@alpha -Dcraco.config.js文件新增配置如下,antd这里没有还没引入js// craco.config.js const resolve = (dir) => path.resolve(__dirname, dir) const CracoLessPlugin = require('craco-less') module.exports = { plugins: [ { plugin: CracoLessPlugin } ], // ... }less引入细节具体可查看react部分第8节的通过craco引入less
五. 项目细节
1. 路由使用.tsx文件
路由文件中的
element属性对应的<组件xx />这种写法是jsx语法,不能直接在ts文件中写jsx,所以需要用tsx文件tsx文件中,使用JSX时,React必须在作用域内,所以需要引入React
2. 函数式组件参数类型注解方式
方式一:
tsxinterface IProps { name: string age: number height?: number } const Download = (props: IProps) => { return ( <div> <span>{props.name}</span> <span>{props.age}</span> </div> ) } // 弊端:没有函数组件本身的一些属性的类型提示 Download.defaultProps = {}方式二:
tsx// type FC = FunctionComponent const Download: React.FC<IProps> = (props) => { return ( <div> <span>{props.name}</span> <span>{props.age}</span> </div> ) } // 相比于上方式一:有函数组件自身相关的一些属性的类型提示 Download.defaultProps = {}
3. React.FC类型的children属性的变化
当我们一个函数组件的类型注解为
Reatc.FC时,如果该组件在实例化使用时,内部还嵌套了其他元素或组件时,场景如下:tsximport React from 'react' interface IProps { name: string age: number height?: number } const Download: React.FC<IProps> = (props) => { return ( <div> <span>{props.name}</span> <span>{props.age}</span> </div> ) } // 外部使用 <Download name="later-zc" age={23}> <div>heheh</div> 呵呵 </Download>目前的
Reatc.FC(2022.11.13)的类型typescripttype FC<P = {}> = FunctionComponent<P>; interface FunctionComponent<P = {}> { (props: P, context?: any): ReactElement<any, any> | null; propTypes?: WeakValidationMap<P> | undefined; contextTypes?: ValidationMap<any> | undefined; defaultProps?: Partial<P> | undefined; displayName?: string | undefined; }我们知道组件内部可以通过
children属性获取到传入的内容,但是目前的React.FC类型是没有自带children属性的,那就需要手动添加tsximport React from 'react' // 统一导入,相较于通过React.xxx的方式更好一些 import type { FC, ReactNode } from 'react' interface IProps { name: string age: number height?: number // children?: React.ReactNode 等价于下面写法 children?: ReactNode } // type FC = FunctionComponent // const Download: React.FC<IProps> = (props) => { 等价于下面写法 const Download: FC<IProps> = (props) => { return ( <div> <span>{props.name}</span> <span>{props.age}</span> </div> ) }ReactNode的类型typescripttype ReactNode = ReactElement | string | number | ReactFragment | ReactPortal | boolean | null | undefined;早期的时候,是可以在组件内部通过
children属性获取到嵌套在组件内部的内容因为早期的时候,
React.FC的类型中props属性的类型声明,不仅仅只是所传入的泛型,还交叉了另外一个类型PropsWithChildren,所以就会自动生成一个children属性typescripttype PropsWithChildren<P = unknown> = P & { children?: ReactNode | undefined };
4. 基于useSelector封装的useAppSelector
帮助我们可省略在使用
useSelector()时,每次需要手动添加state参数类型注解而是通过
useAppSelector函数的调用,主动推导出state的类型,且为slice中的initialState的类型typescript// store/index.ts import { configureStore } from '@reduxjs/toolkit' import counterReducer from './modules/counter' import { useSelector, TypedUseSelectorHook } from 'react-redux' const store = configureStore({ reducer: { counter: counterReducer } }) // const state = store.getState() // type StateType = typeof state // 等价于上面注释的写法 type GetStateFnType = typeof store.getState export type RootStateType = ReturnType<GetStateFnType> // useAppSelector 辅助函数,省略 state 中的类型注解,自动推导 // TypedUseSelectorHook 利用调用签名的形式,帮助我们推导出 state 的类型 export const useAppSelector: TypedUseSelectorHook<RootStateType> = useSelector export default storecounterSlicetypescriptimport { createSlice } from '@reduxjs/toolkit' const counterSilce = createSlice({ name: 'counter', initialState: { num: 100, age: 18 }, reducers: {} }) export default counterSilce.reducer使用
tsximport React from 'react' import { shallowEqual } from 'react-redux' import { useAppSelector } from './store' // import { RootStateType } from './store' // import store from './store' // type GetStateFnType = typeof store.getState // type RootStateType = ReturnType<GetStateFnType> function App() { const state = useAppSelector( // 此处使用 (state) => ({ counter: state.counter.num }), shallowEqual ) return ( <div className="App"> </div> ) } export default App
5. 基于useDispatch封装的useAppDispatch
封装
typescript// store/index.ts type DispatchType = typeof store.dispatch export const useAppDispatch: () => DispatchType = useDispatch使用:
tsximport React from 'react' import { shallowEqual } from 'react-redux' import { useAppSelector, useAppDispatch } from './store' import { changeNumAction } from './store/modules/counter' function App() { const state = useAppSelector( (state) => ({ counter: state.counter.num }), shallowEqual ) const dispatch = useAppDispatch() // 此处使用 const handleChangeNum = () => dispatch(changeNumAction(20)) return ( <div className="App"></div> ) } export default App
6. 基于上面两个的封装,再来个appShallEqual
为了不从两个不同中导入,而都从一个文件中导入,将
shallEqual也封装进去封不封装都可以
typescript// store/index.ts export const appShallowEqual = shallowEqual使用:
tsximport React from 'react' import { shallowEqual } from 'react-redux' import { useAppSelector, useAppDispatch, appShallowEqual } from './store' import { changeNumAction } from './store/modules/counter' function App() { const state = useAppSelector( (state) => ({ counter: state.counter.num }), appShallowEqual // 此处使用 ) const dispatch = useAppDispatch() const handleChangeNum = () => dispatch(changeNumAction(20)) return ( <div className="App"></div> ) } export default App
7. 给process.env中的自定义环境变量添加属性提示
react-app-env.d.ts文件中新增interface配置typescript/// <reference types="react-scripts" /> + declare namespace NodeJS { + interface ProcessEnv { + readonly REACT_APP_BASE_URL: string + } + }我们定义的
ProcessEnv接口会合并react-scripts中定义的ProcessEnv接口,这样我们在访问process.env中的属性时,会有对应的属性提示
8. 类组件的类型声明
import React, { PureComponent } from 'react'

interface IProps {
  name: string
  age: number
}

interface IState {
  msg: string
  counter: number
}

interface ISnapshot {
  num: number
}

class Demo extends PureComponent<IProps, IState, ISnapshot> {
  state = {
    msg: 'hello',
    counter: 0
  }

  // 下面注释的内容,可以省略写constructor
  // 当派生类不指定构造函数时,会使用默认的构造函数,该函数有调super且传入constructor中的参数
  // 而PureComponent中泛型传入的IProps、IState,根据其内部实现,有对应的验证和属性提示

  // constructor(props: IProps) {
  //   super(props)
  //   this.state = {
  //     msg: 'hello',
  //     counter: 0
  //   }
  // }

  getSnapshotBeforeUpdate(
    prevProps: Readonly<IProps>,
    prevState: Readonly<IState>
  ) {
    return { num: 100 }
  }

  // 第三个参数snapshot的类型就是我们上面传入的ISnapshot
  componentDidUpdate(
    prevProps: Readonly<IProps>,
    prevState: Readonly<IState>,
    snapshot?: ISnapshot | undefined
  ): void {
    console.log('snapshot.num: ', snapshot?.num)
  }

  render(): React.ReactNode {
    // 注意:但是传入ISnapshot之后,会对name,age的类型做一个验证,从而产生新的报错
    // 关闭eslint的ruls配置中的'react/prop-types': 'off' 即可
    // 或者一般我们也不会传入第三个泛型参数ISnapshot,也就不需要关闭
    const { name, age } = this.props
    return (
      <div>
        <div>{name}</div>
        <div>{age}</div>
        <div>{this.state.msg}</div>
      </div>
    )
  }
}

export default Demo
9. styled-components添加类型声明
在安装了
styled-components包之后,在ts文件中引入styled,如下:typescript// style.ts import styled from 'styled-components'会引起报错:
- 无法找到模块
“styled-components”的声明文件。“c:/Users/23634/Desktop/learn/learn_ts/react-ts-music/node_modules/styled-components/dist/styled-components.cjs.js”隐式拥有"any"类型,尝试使用npm i --save-dev @types/styled-components(如果存在),或者添加一个包含declare module 'styled-components';的新声明(.d.ts)文件
- 无法找到模块
解决方法:
- 方式一:下载对应的声明文件包
@types/styled-components - 方式二:在
.d.ts文件中添加声明:declare module 'styled-components';
- 方式一:下载对应的声明文件包
10. antd4.x版本与5.x版本上的用法区别
这里默认已经安装了
craco,并配置了craco-less4.x版本的用法安装
antdshellnpm i antd -D引入
antd的样式文件,因为antd有tree shaking,所以不需要按需引入样式less@import '~antd/dist/antd.less';修改
craco.config.js文件如下jsconst CracoLessPlugin = require('craco-less'); module.exports = { plugins: [ { plugin: CracoLessPlugin, options: { lessLoaderOptions: { lessOptions: { modifyVars: { '@primary-color': '#1DA57A' }, javascriptEnabled: true, }, }, }, }, ], };
5.x版本用法安装
antdshellnpm i antd -D直接引入对应的组件即可
如果样式用的
less,想用,还是得在craco.config.js文件中配置craco-less
11. antd的Carousel走马灯组件是基于react-slick
- 在
antd的Carousel走马灯组件中,官方只列举了一些属性和方法,一些其余的属性是没有列举的(如autoplaySpeed),由于该组件是基于react-slick封装的,所以我们直接去react-slick中查找即可
12. 结合TS类型获取antd的Carousel走马灯组件实例
import type { FC, ReactNode, ElementRef } from 'react'
import { Carousel } from 'antd'

// ...
const bannerRef = useRef<ElementRef<typeof Carousel>>(null)
// ...
<Carousel ref={bannerRef}></Carousel>
六. 区分当前环境是development还是production
react-scripts的环境变量:webpack在一个特殊的process.env对象上暴露环境变量以
REACT_APP开头命名的自定义环境变量,更改任何环境变量都要重启正在运行的开发服务器才能生效shellREACT_APP_BASE_URL = 'http://aaa' REACT_APP_NAME = 'later-zc'三种方案:
typescript// 1.手动区分开发环境和生产环境 export const BASE_URL = 'http://aaa' export const BASE_URL = 'http://bbb' // 2.代码逻辑判断, 根据vite默认提供的环境变量 判断当前环境 let BASE_URL = '' if (process.env.NODE_ENV === 'development') { BASE_URL = 'http://aaa' } else { BASE_URL = 'http://bbb' } // 3.通过创建.env.xxx文件直接创建变量 // .env.development REACT_APP_BASE_URL = 'http://aaa' // .env.production REACT_APP_BASE_URL = 'http://bbb' console.log(process.env.REACT_APP_BASE_URL)